Creating Lush Custom Pads with Ableton’s “Spectral” effects

Ableton Live 11 brought many quality of life improvements and little tweaks to optimize the overall experience. Redux now offers built in filtering options to tame the harshness and give us a much larger range of sounds, Chorus-Ensemble got a vibrato mode and several different options for lush more stereo sounds and phaser flanger has been made a lot richer with shorter delay times now available. The Ableton team has also bestowed on us some new devices.
PitchLoop89
PitchLoop89 is a glitchy audio processor based on primitive digital effects units. Created with the collaboration of Robert Henke, the legend behind “Granulator”. Hybrid Reverb brings convolution to Ableton and allows users to combine it with one of several new distinct algorithms including a “Shimmer” mode. Convolution reverb generates it’s sound around an impulse response. What’s an impulse response? That’s essentially a recording of a real world environment that can be used to extract it’s properties. They’re made by playing a sweep of the audible spectrum and using an algorithm, analyzes the response, so you can use the sound of real world environments and buildings in your computer music.
Spectral Time
The effects we’ll focus on today are the two “Spectral” effects, Spectral Time and Spectral Resonator. Central component of these two devices is their ability to chop a sound up into microscopic pieces and smear it in real time. Similar to granular synthesis, in which a small piece of audio has it’s individual slices played back in random order with varying speeds. The spectral effects allow users to conduct this process as a track is playing. What makes these two devices unique is that they break up the frequency spectrum and allow for processing in certain areas and bands.
First let’s cover spectral time, which can be found in Audio Effects > Delay and Loop > Spectral time! The device is split into two modules, Freezer and Delay.

Taking a cross section of your sound’s sonic texture and smearing it until freeze is turned off or the next cross section is cut. Having it in Manual mode allows you to simply click the blue Freeze button and just like that, the audio spectrum is frozen in time. Effects that you have proceeding it can be used to make interesting drone sounds. We could, for example, freeze a sample, turn the wet dry all the way up and then proceed with a chain of modulation effects.
Ableton’s Reverb also has a freeze function too, and both of them are midi mappable so they can easily be assigned to a pad to create an easy toggle switch. Don’t forget to play around with the fade in and out controls to determine how quickly the effect builds up and drops out. Retrigger mode allows the freeze to be turned on and off by external factors, either time or a transient in the sound. In manual mode we control when the freeze is on and off, triggering once brings in the effect and then a second time fades it out. Retrigger mode freezes the sound until something causes another freeze and the cycle repeats. Onsets allow a loud part of the sound to trigger the freeze (with adjustable sensitivity) this can be nice to put over a chord progression.


The other main module is of the Spectral Time device is Delay, which can actually operate as a pretty standard delay with it’s wet/dry, feedback and time controls.
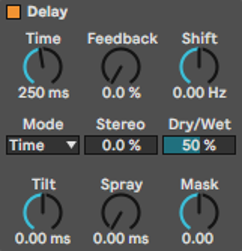
However, where the module shines is its ability to take the echos and mash them together to create unique textures. Tilt and Spray control how spectrum is processed. At lower tilt values, the low end is delayed more and vice versa for higher values and high end. Spray distributes a difference in the delay time throughout the spectrum. The image below can give you an idea of what this can do.
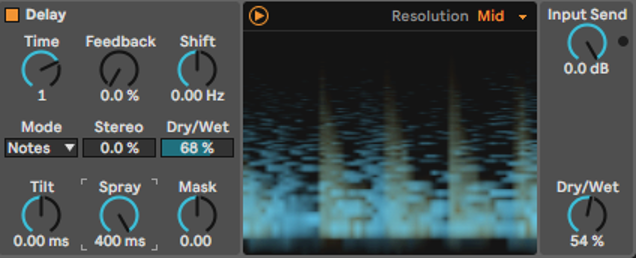
There’s also a control that adds a slight pitch shift to the affected signal. You can mix how these modules affect the sound with the Wet/Dry control for the delay module and then at the end of the chain there is an overall Wet/Dry. Both of the Spectral Devices have an indicator spectrogram screen.
The orange light being representative of the dry unprocessed harmonic content and blue being the wet. As you change the settings you’ll be able to see which areas of the frequency spectrum are being affected.
...and now onto it’s cousin. Spectral Resonator!
Spectral Resonator
This effect processes sound in a similar way to “Resonators” a legacy Ableton effect that applies a chord or tonal sound over atonal noise. It takes the textural aspects of noise and the tonal sound follows it.

It’s an excellent way of creating unique sounds from field recordings. Looking at the waveforms of recordings (or samples) gives you some insights as to what you’ll receive from the resonator. The sound of a glass being placed on a table would give you a short pluck, recording a car going past would give you a slow rising attack and decay. A personal favourite of mine is recording a stone scraping across a metal fence. All of the little hits come out in the resulting sound. This can be great for making a harmonically rich bass sound.
Spectral Resonator is a device that operates similar to Resonators in that it adds harmonic synth-like sound over the top of an audio input signal. It’s an incredibly unique way of tailoring a synth tone that fits perfectly over another part of a track. This device is a little bit different in how it operates. It gives you a bit more to play with. Like how Spectral Time is separated into its Freeze and Delay modules, Spectral Resonator is split into a resonator control section and a powerful, and very easy to use modulation section that adds super lush tonality to the resulting sound.

Let’s take a tour of the device’s controls (starting from the middle because that makes it a little bit easier). Frequency (which can later change to “Transpose”) lets you choose the frequency of the resonator sound. You can be super precise with a specific Hertz value or choose a note with the note toggle. Decay, how quickly the generated sound drops out, settable from a snappy 1ms to an oceanic 20 seconds. Then there’s two controls that dampen the high and low end of the sound. These controls are the “regular” ones and will feel familiar to users of the Resonators device and standard filters.

Let’s take a dry beat, or percussion loop and let's start applying the effect to understand it’s sounds. Below are some good candidates:
https://samplefocus.com/samples/arab-percussion-loop-15
https://samplefocus.com/samples/gritty-drum-break-drums-loop
https://samplefocus.com/samples/dry-straight-beat-trap-loop-sizzling
https://samplefocus.com/samples/boom-bap-beat
Go digging for yourself and see what you can find as good base material!
Keep the modulation module on the “none” mode for now and set the dry/wet to 50%. As the loop plays, play around with some of the aforementioned controls to get a feel for how the device responds to input. Right now, the sound might be a little bit harsh. This is because the device is pumping out the maximum level of harmonic content to the sound. At the top of the spectrograph there’s control called Harmonics. By dialing down the harmonics you can make a more subtle or bassier sound.

Two other options you get for more subtle variation in your sounds is. “Stretch” and “Shift”, both of them affect the pitching of the effect. Stretch increases the space between the harmonics, 100% up or down gives you the effect of going up or down an octave. Shift is a process made to the input signal before the resonance is added, shifting it up or down by a number of semitones to target different parts of the frequency spectrum.
A thought that might come to mind while applying pitch resonation to a signal might be: “Can we use this as an instrument to add chords, melody, or bass?” Well, Yes! Even better news is that it’s a lot easier than with the previous Resonators device, which required third party tools. The left panel hosts midi controls. Let’s make an external midi channel and build a chord progression.


To eagle-eyed users, the MIDI matrix may look a little different. Apart from the slightly thicker outlines in this version, I’ve turned on scale mode in the MIDI clip view which discloses the properties of the clip. To use it, toggle scale mode and pick a root and scale type from the drop downs.

Set the left panel to MIDI mode and select our midi channel as an input. Now, if the midi clip is playing, Spectral Resonator’s tonality will be playing the midi notes of our external midi channel.

Just like that our simple dry beat has this harmonic sense of life. We can now use that aforementioned transpose control to place it in the right octave range that suits our taste. The chords I have input here are simple three note chords but we can always go further by simply upping the number next to “poly” to add voices. For a bass sound, you may want to set it to mono.
Now let's look at the in-device modulation options, these modulate the frequencies output by the resonators in different ways. Chorus adds modulation to the pitch of every partial (so every frequency added beyond the root or roots if a chord is being played). Wanderer is a bit more subtle in my opinion, it ramps random areas of the spectrum. Granular is one of the more unique areas of the effects, start with the mod rate at 0% and slowly ramp it up to get a feel for what this mode does. It’s adding in little granules of pitched sound at random intervals, giving you this very unique crystalline sound to compliment your input signal and midi. The experimental options here make this a truly fascinating device. I believe the chorus is the most conventionally “nice” sounding of these choices for thick pads and lush basses, however music isn’t always about sounding nice. We can love our sonically destructive and grimy sounds just as much as our conventional ones!
Have fun with these effects and enjoy the process of flipping and enhancing the samples and loops you find to create your own sound.