Layering serves two purposes: to make a sound bigger and more immersive, as well as to add a personal touch to your sample-based track.
Sample layering can be used in countless situations, but essentially means putting two or more sounds together to create a new one. The hardest part about it is making sure that these stacked audio files work well together and feel like a unique and cohesive sound.
Good layering is about intuition, and understanding the sonic relationship between different samples: do their frequencies clash? Do their tones work well together? Do they complement each other without muddying the mix?
Today, we take a look at the art of sample layering; how it’s done, how to make the most of your samples, and make the necessary adjustments to create a harmonious mix.
But before that, let’s start with some definitions.
- What Is Sample Layering?
- Why Layer Samples?
- How to Layer Samples Step by Step
- Layering by Instrument Type: Overview
- Drums
- Synths and Pads
- Vocals
- Final Thoughts
What Is Sample Layering?
Sample layering is when you put together multiple pre-recorded sounds to create a new one, “putting together” meaning to place them in your DAW so that they play simultaneously or almost.

You can use this technique with virtually any instrument or sample. Common uses include: to stack snares for extra punch, blend different bass hits to enhance warmth or attack, or layer ambient textures to build soundscapes.
Why Layer Samples?
In short, the goal with sample layering is to make each sound complement the others:
- Do you want to use a sample that lacks the power necessary to hold its place in your mix? Sample layering is the solution.
- Do you want to give a unique touch to a sample and make it unmistakably yours? Sample layering can give you exactly that.
- Do you need a groovier beat? By carefully stacking noises and hits, you can craft a powerful and colorful drum section unlike any other.
In post-production, you might feel the need to layer samples for a few reasons. One is because you hear frequency gaps in the mix; by layering different samples, you can make the mix sound fuller and more balanced.
Producers also layer samples to add texture. Blending different sounds can add depth and character to your piece and makes it more interesting. Layering can also improve a track’s dynamics: mixing samples with different volumes, attacks, or tones can add movement and energy to a song.
Last but not least, layering is also a good way to make samples sound unique. Even if a producer uses a common sample, mixing it with other sounds can turn it into something new and help the track stand out.
How to Layer Samples Step by Step
General Rules
Every sound you use should have a clear role. One might fill out your track, another adds punch, and another sets the mood. Pick samples that fit together instead of fighting each other; for instance, you can pair a strong drum with one that fades out longer, or mix a bright synth with a soft pad to create contrast.
The Sample Focus library can help you with this as it allows you to sort sounds by tone, texture, and feel until you find a perfect match.
Once you've chosen your samples, the next step is to make them fit together.
Make sure the timing and pitch are in sync. After lining them up, use EQ to create space so the sounds don't clash.
Then you can use compression or transient shaping to control volume and bring the sounds together. Add a little saturation for warmth, and use panning, automation, and reverb to create movement in your mix. If you want to experiment more, you can also try reversing, bitcrushing, or resampling to create some surprising textures.
Layering by Instrument Type
Drums
There are certain genres in which careful drum layering makes the difference between a hit and an unfinished demo. Think of hip hop, rap, IDM, breakbeat, or glitch hop; where would these genres be without the producers’ obsession for intricate and rich drum patterns?
Remember that each layer should have its own role: one sample might add low-end weight, another brings midrange punch, and a third adds subtle texture or brightness.
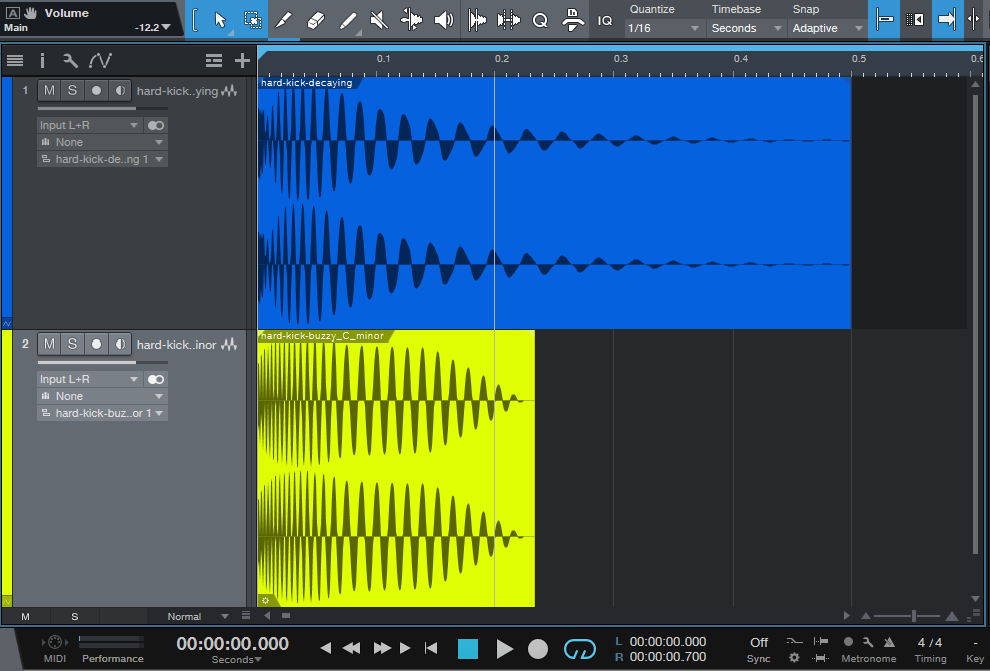
For example, you can blend a tight kick with a slightly distorted or noisy one to make a thicker sound; if the second kick makes the attack too soft, lower it down or use EQ so it supports the main sound instead of competing with it.
The same idea works for snares. Try layering a sharp rimshot with a softer clap, or mix in something unusual like a snapped twig, a hand clap, or a short percussive sound; these subtle layers will add character and keep your drums interesting.
If two drum layers sound weaker together instead of stronger, they might be out of phase. It’s a common issue but also easy to fix: try flipping the polarity of one layer or moving it slightly in time until the combined hit feels strong and balanced.
Rather than using just one hi-hat sample, try mixing a bright hat with a more textured one. This will add movement and realism to your groove, especially if you adjust their timing or pan them differently.
You can also add small percussive sounds like shakers, tambourines, clicks, or filtered noise to give sparkle to the high end. Just be careful not to add too much, so the top stays clear and not harsh.
Synths and Pads
When layering synths and pads, I'd recommend you focus on width and depth:
- Keep your melody or main chords mostly mono to keep them in focus
- Make the lead a bit wider
- Let pads fill the stereo field to enhance the atmosphere.
Use EQ on each layer so they don’t clash: give the main melody more mids, leaving the leads to fill the upper mids, and keeping the pads bright but without extra low end, where your powerful bass should be.
This idea works for any style, but especially in electronic music, where wide synths and reverbs help create an immersive space, while leads and basses stay closer to the center.
If a layer doesn’t add anything important, just mute it. The goal isn’t to immerse listeners in sounds, but rather to create a cohesive soundscape that feels rich regardless of how many sounds it features.
Vocals
Vocal layering is a great way to enrich your mix. There’s no golden rule, but here’s how you can get started:
Start simple, with one clean main vocal sample of your verse. Then use a second overdub layer that highlights important words or phrases. Keep the overdub a bit quieter, so that it doesn’t overshadow the main vocals.
For choruses, it’s common practice to use two identical vocal samples, pan one to the left and the other to the right, and then add a third layer in the center to emphasize certain lines.
Use reverb, delay, or even light saturation to make your vocal samples blend with the mix.
Get creative: add whispers, shouts, or a pitched-down version of your main vocal sample to add variety. If you use vocal chops, try mixing clean cuts with some that are reversed or stretched. Experiment with panning and EQ, all the while making sure all samples still blend naturally with your main vocal.
Final Thoughts
Now that we have covered all aspects of sample layering, it’s time to turn this knowledge into great music.
Head over to the Sample Focus library, where you can find countless samples of any kind, from catchy grooves to emotional vocals, and stack them together to create something no one has ever heard before.
Good luck, and stay creative!


Comments